jdbc:jtds:sqlserver://host:port;databaseName=$dbname;domain=domainName;useNTLMv2=true;
Thursday, December 15, 2016

Tuesday, December 03, 2013
AD FS with Office 365 Step by Step Install Guide
In this step by step guide, we’ll walk you through configuring Active Directory Federation Services (AD FS) for use with Office 365. In this first document we’ll just install a single server. Later we’ll show you how to introduce an AD FS Proxy Server and redundancy.
Add your Domain to your Office 365 Account
Since we are starting from the very beginning. The first thing you’ll have to do is sign into your Office 365 account and go into the Domains area. Click the Add a domain link to add your domain.

Enter the domain that you want to Federate and click the Check Domain button.

You will then be asked to confirm the domain details. If everything is correct, click Next.

Finally you be given instructions on how to create a TXT record in your Internet DNS. The TXT record is Microsoft’s way of verifying that you own the domain and creating this record does not impact any existing services. After you create the TXT record in DNS you must return to the Office 365 Administraton site and verify the domain by clicking the Verify button.

Install AD FS
Now that your domain has been added and verified, we can move on to installing AD FS in your local Active Directory. The big requirements for this step are:
- Your Active Directory Domain must be in Windows 2003 mixed or native mode.
- You must have a Windows Server 2008 or Windows Server 2008 R2 to install AD FS on.
You must first download AD FS 2.0 from:
When you launch the install program, click Next.

Accept the license and click Next.

On the Server Role screen, choose Federation Server and click Next.

The wizard will automatically install the required prerequisites. Click Next to begin the installation.

When the installation is complete, uncheck “Start the AD FS 2.0…..” and click the Finish button. The reason we are unchecking that box is IIS was installed as part of the prerequisites and we now need to use IIS to request a certificate.

Obtain a Certificate for use with AD FS
In this example, we’ll request a certifcate from a public certification authority. Unless you already have a certificate infrastructure deployed, it’s probably best to puchase a certificate instead of generating your own. Trust us on this one, just spend the money on a certificate, it will save you a lot of time.
On the server you just installed AD FS on, open IIS Manager and click on Server Certificates.

Then click on Create Certificate Request

In this example we’ll be requesting a wildcard certificate. A wildcard cerficate is not necessary, but we plan on using this same cerificate for Exchange rich coexistence. The important field is the Common Name field. In the image below, you can see it’s *.domain.com. In most cases (where you want external users on the Internet to be able to authenticate) Domain.com must be your external domain name. If you were are not requesting a wildcard cert the name would something like fs.domain.com, or adfs.domain.com.

On the next screen, ensure the Bit Length is at least 2048 and click Next.

Finally, specify a file name for the certificate request and click Finish.

You must now take the request to a public certification authority such as GoDaddy or Verisign. When the request has been processed, they will provide you with a Certificate.
Importing the Certificate
After the certificate request has been processed, you’ll need to import the certificate. To do that through IIS, you must go back to the Server Certificates and click Complete Certificate Request:

Browse to the Certificate file and enter the friendly name. In this example a wildcard cerficate was used, so the friendly name will be *.domain.com. If you used a different name, such as fs.domain.com or adfs.domain.com, you’d enter that name here as well.

After the certificate has been imported, you’ll want to verify it by going back to Server Certificates in IIS.

Next, you’ll need to add the Certificate to the Default Web Site. With the Default Web Site Selcted click Bindings.

Click Add

Choose Type https, IP addresss All Unassigned, and Port 443. Then select the newly imported certificate and click Ok.

The site bindings should now look like:

Configuring AD FS
Now that we have the cerficate installed, we can resume the AD FS configuration. To launch the AD FS configuration wizard, just go into Administrative Tools and click on AD FS 2.0 Management.

When the AD FS Management Console opens, click the AD FS 2.0 Federation Server Configuration Wizard Link.

Select the option to Create a new Federation Service

On the next screen select New federation server farm. Choose this option unless you are absolutely sure you’ll never be installing a second AD FS server. It doesn’t hurt anything to have farm with only a single server, but it might give you more options down the road if you want to add redundancy.

On the Federation Service name, choose the certificate to use. In this example a wildcard certificate was used, so the name must be specified, fs.domain.com. This is the name clients will connect to, so it must be resolvable via DNS both internally and externally.

You must then specify a Service Account in Active Directory that will be used by AD FS.

On the Summary Screen review the changes that will be made and click next to begin the configuration.

When the installation is complete, click Close.

Install and Configure the Office 365 PowerShell Module
The next step is to download the PowerShell module and configure the Trust with Office 365. The PowerShell Module comes in 2 versions.
After the tool has been downloaded, run through the installation wizard.
Install the Sign-In Assistant
The Sign-In Assistant must be installed next. It comes in 32 and 64 bit versions.
Launch the Sign-In Assistant installer and click the Install button.

When the installation is complete, click Finish.

Set up the Trust with Office 365
We must now open PowerShell to convert the domain we previously added to Office 365 to a Federated domain. You’ll want to run Microsoft Online PowerShell as Administrator.

Type $cred=Get-Credential and hit Enter. This cmdlet prompts you for credentials. Type your Office 365 administration account credentials.
Type the following and hit enter:
Connect-MsolService –Credential $cred
Type the following, where domain is the name of your domain and hit enter:
Convert-MsolDomainToFederated –DomainName domain.com
If successful, you should see the message:
Successfully updated ‘domain.com’ domain.
Enable Directory Synchronization
Now that the AD FS server is set up we are ready to enable Directory Synchronization. Before you begin you should make sure the following requirements are met.
- You have a 32 bit Windows 2003 or 2008 Server to install Dir Sync on.
- The server cannot be a domain controller, but must be a member of the domain.
- You must have an account which has Enterprise Admin rights to the local Active Directory.
- .Net 3.5 or later and PowerShell
You’ll need to start the Directory Sync configuration in the Portal by click on Users (under Management in the left column). Once there, click on Set up Active Directory Synchronization.

Work through the checklist and on Step 3, click Activate and then in Step 4, download the client.

Run DirSync.exe and click the Next button on the welcome screen.

Accept the License Terms and Click Next.

Choose the installation folder and click Next to begin the installation.

When the installation is complete, click Next. Verify the “Start Configuration Wizard now” box is checked and click Finish.

When the configuration wizard appears, click Next on the welcome screen

Enter your Office 365 Administrator Credentials and click Next.

Enter the username and password for local Active Directory Enterprise Admin and click Next.

If you plan on using Rich Coexistence, check the Enable rich coexistence box. In this example the option is not available because there is not an Exchange 2010 Server. Click Next to begin the configuration.

When Complete, click the Finish button to begin the initial synchronization.
When the directory synchronization is running check the events in the Application Event log to see the current status.
Testing AD FS
At this point we should be ready to do some basic AD FS testing. The first thing you’ll probably need to do is create an account in your local Active Directory (without a mailbox if you have Exchange). You’ll need to make sure the account’s UPN suffix is @domain.com. If your Internal Active Directory Namespace is something like domain.local, or anything other than domain.com, you’ll probably have to add an additoinal DNS suffix to the domain so you can assign it to users. See the following article for more details:
Once the account is created, let it replicate into Office 365 and then assign it a license.
Before we can try and sign in there are a couple more things that need to be done on the workstation you’ll be testing from.
First, Sign-In Assistant must be installed. It comes in 32 and 64 bit versions.
Download and install the appropriate version.
Second, you’ll probably need to modify your Internet Explorer settings so you can automatically authenticate with the AD FS server. The default settings in IE seem to be that Automatic Login occurs only in the Intranet Zone.

So to keep things simple we just need to put our AD FS server in the Intranet Zone. This will allow Internet Explorer to automatically pass the user’s credentials to the AD FS server.

Finally, sign into the workstation as the test account and browse to https://portal.microsoftonline.comwhen prompted for the user name enter user@domain.com, or in this exampletestuser2@office365demo.com. When you enter the user name, you’ll notice the Password Area turns grey and you must click the link to Sign in.
When you click the link pay close attention to the Address bar in your browser, what you should see happen is your client connecting to your AD FS server, for example fs.domain.com. If you get prompted for credentials, you should check your Internet Explorer settings, if you get a page cannot be displayed, check your DNS to make sure the client can resolve the AD FS server.
If all goes well you’ll be automatically logged into the Portal.
At this point, you should have a very basic AD FS install complete. Reveiw our other articles for more advanced configuration options.
Wednesday, November 27, 2013
Connect MySQL to squirrel Client and importing csv and excel files in MySQL
SQuirreL is great because is universal and platform independent. You can use it to connect to almost every database that you can imagine.
The only drawback is that it doesn't ship with the database drivers due to licensing issues.
So here is a step-by-step procedure for connecting to MySQL from SQuirreL.
First of all verify that you have network access to the mysql host and its port. Usually mysql servers run at port 3306, so test the connection from your host:
If you get something like:
then you won't be able to connect.
The correct response you should get is something like:
Then you must check that the database user you will be using has access from the host that the squirrel client will run.
You can check the privileges using phpmyadmin, or by command line:
GRANT USAGE ON *.* TO 'user'@'hostname'

Step 2: Launch SQuirreL Application
Step 3: Click on Drivers tab from left hand side (or) from Menu Drivers
Step 4: Under the Drivers List find the selected database. In our case "MySQL Driver". Right click on the database and click on <Modify Driver...> option

Step 5: The Database driver window will pop up. Now click on "Extra Class Path" Tab.

Step 6: Click on <Add> action button. And select the downloaded driver file (jar) from the path and click <Open> action button.
Note: Repeat the Step 6 if you have more than on .jar file for the selected Database Driver

Step 7: Now you can see all the added jar files are listed under the "Extra Class Path". Click <Ok> to apply the changes to the Database Drivers.

The only drawback is that it doesn't ship with the database drivers due to licensing issues.
So here is a step-by-step procedure for connecting to MySQL from SQuirreL.
First of all verify that you have network access to the mysql host and its port. Usually mysql servers run at port 3306, so test the connection from your host:
telnet xxx.xxx.xxx.xxx 3306
If you get something like:
Trying 127.0.0.1...
telnet: Unable to connect to remote host: Connection refused
then you won't be able to connect.
The correct response you should get is something like:
Trying xxx.xxx.xxx.xxx...
Connected to xxx.xxx.xxx.xxx.
Then you must check that the database user you will be using has access from the host that the squirrel client will run.
You can check the privileges using phpmyadmin, or by command line:
GRANT USAGE ON *.* TO 'user'@'hostname'
Download the latest Squirrel client from the url below:
Squirrel SQL Client is a graphical Java program that will allow you to view the structure of a JDBC compliant database, browse the data in tables, issue SQL commands etc. The minimum version of Java supported is 1.6.x as of Squirrel version 3.0. To download Java -
- installing the squirrel-sql-3.0.3-install.jar
The SQuirreL SQL Client is installed with the IzPack Java installer. Download the file squirrel-sql-<version>-install.jar and execute it using the following command:
java -jar squirrel-sql-<version>-install.jar
Make sure that you have write privileges to the directory that you want to install into.
Note that some browsers may attempt to open this file rather than download it. In this case, right-click on the download link and click your browser's equivalent of the "Save as..." menu item.
On Windows, execute the file squirrel-sql.bat to run the application. On Unix, the file is squirrel-sql.sh


Adding Mysql Driver to squirrel sql
java -jar squirrel-sql-<version>-install.jar
Many of you might have faced the issue of loading the driver for the SQuirreL for specific Database Drivers. For myself I faced issue when I do not have MySql installed in my machine, the SQuirreL is unable to configure the driver.
The below is simple step how to configure the drivers manually by downloading the driver files from the provider's site.
Step 1: Download the JDBC driver library (*.jar) from the provider's site.
For example, the mysql JDBC drivers are available for download from mysql site (brlow url).
The below is simple step how to configure the drivers manually by downloading the driver files from the provider's site.
Step 1: Download the JDBC driver library (*.jar) from the provider's site.
For example, the mysql JDBC drivers are available for download from mysql site (brlow url).
Copy the “Text_JDBC30.jar” file to the “lib” directly of the installation directory
C:\Program Files\SQuirreL SQL Client\lib (if you didn’t change the location.
Launch the Squirrel client – Create a desktop short-cut if desired
C:\Program Files\SQuirreL SQL Client\squirrel-sql.bat
C:\Program Files\SQuirreL SQL Client\lib (if you didn’t change the location.
Launch the Squirrel client – Create a desktop short-cut if desired
C:\Program Files\SQuirreL SQL Client\squirrel-sql.bat
Step 4: Under the Drivers List find the selected database. In our case "MySQL Driver". Right click on the database and click on <Modify Driver...> option
Step 5: The Database driver window will pop up. Now click on "Extra Class Path" Tab.
Step 6: Click on <Add> action button. And select the downloaded driver file (jar) from the path and click <Open> action button.
Note: Repeat the Step 6 if you have more than on .jar file for the selected Database Driver
Step 7: Now you can see all the added jar files are listed under the "Extra Class Path". Click <Ok> to apply the changes to the Database Drivers.
Creating Aliases for Mysql In squirrel client
step 1:Click on “Aliases” tab and then click on the “+” icon
Step 2 :After clicking + icon it will display the Alias window
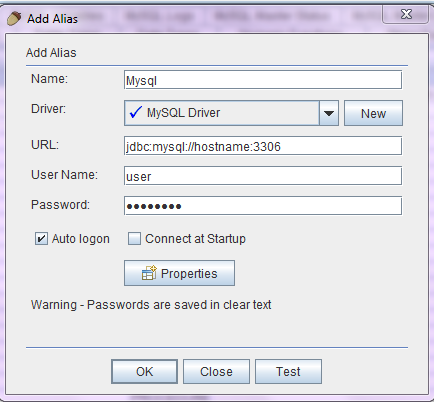
Step3 : under name =name of the alias
under driver select the driver from the list which ever required
under url specify the hostname:portno of DB or required input
under username=give the username of the db
under the password=specify the appropriate password for the given user
select auto logon or connect at startup which ever we required
Step 4: click on Test the connection to verify whether the given parameters are right and click ok'it will
connect to the DB.

How to import data from csv and excel file
Step1: Click on plugins -->summary it will show all the plugins and check whether data import
plugin is enabled

Step 2:Add a jar for text_jdbc in the lib folder and and modify the driver and select the class path of the jar .
Step 3 :select the database-->table in which the data have to be imported
Step 3:create the schema attribute for the required imput of the file in the desired table
Step 4;select the table-->right click -->import data

Step 5:if we import the data it will pop up up this window and it ask to delete the existing record
 Step 6: select the csv file /excel file from the saved location

Step 7 :Select the delimiter type

Step 8: This will Display all the input which was imported from the file
and we can map the attributes to the table by selecting one to one mapping

Step 9: The data will be imported in the table.


Video for connecting MySQL to squirrel client:
Subscribe to:
Posts (Atom)